Your mac doesn’t restart due to no space left on device?
I belong to the haters group of “Your disk is almost full” message.

From time to time, I need to run commands like this on my terminal (after emptying trash):
rm -rf ~/Library/Caches/com.spotify.client/Data/*
Sometimes I’m faced with the understandable* message “no space left on device” of the APFS filesystem when I try to remove a file, which of course the only solution is to reboot the system. After restart, I can work for more 3 or 4 days without the need of this restart.
*APFS needs space to proceed with any operation, even a “rm”
This last time was catastrophic. After restart, for some reason, my disk didn’t cleanup any cache which make my mac to not boot and the black screen with that white message appear: “You need to restart your computer. Hold down the power button….”

So, I needed to enter in Recovery Mode. Right after restart, keep pressed “CMD+R” and your Mac will enter in Recovery mode.

After a while, a piece of hope appears:

I mounted the Macintosh HD, run the terminal, tried to remove the files from “/Volumes/Macintosh HD/Users/myuser/xxx/yyy” and I always was faced with the message “no space left on device”. I had 74kb left on my disk. I couldn’t do nothing at all with it.
I started to think that was time to do a backup of my files, erase the disk, reinstall the macosx system and my apps, and my development environment and…. OH NO! NO! NO! NO! I will not spend my next 2 days doing that.
After some hours of web readings, tries and retries (whose I will not describe here) I finally discover the solution to the question in title.
0. In recovery mode, Through disk utility, I formatted an sdcard with MAC OS Extended (Case Sensitive, Journaled), installed the macosx in the sdcard and, after restarting the computer over the sdcard, I run the steps starting in step 2, by launching the “Disk Utilility” app. It will probably work if you run directly from recovery mode, without this step 0, so give it a try first before proceeding with this step 0.
- After restarting in recovery mode, Run Disk Utility

2. Check if Macintosh HD is mounted

Look to the last icon in the middle. In this case is already mounted so I don’t need to do nothing, but you will probably have a mount icon. Click on that. Wait a few seconds and you’re ready to go to next step.
3. Exit Disk Utility

4. You’ll be back to initial screen of recovery mode. It’s time to run the terminal:
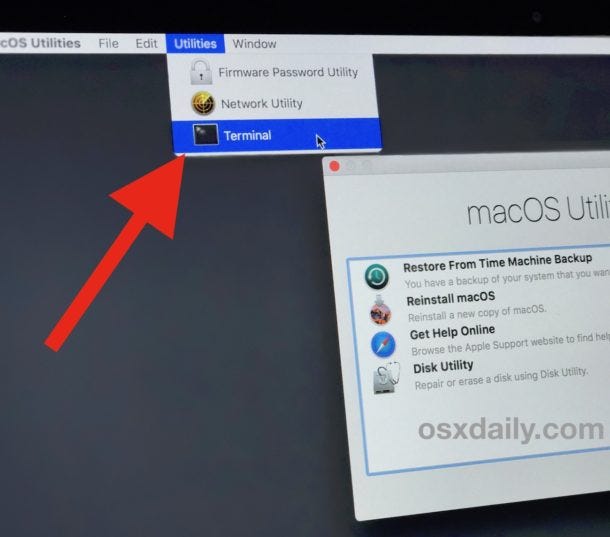
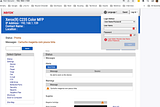
5. The magic starts now. On terminal, run “diskutil list” command.

You’ll see that you have one container at /dev/disk1 (in this case). You’ll probably see /dev/disk2 (in recovery mode). Look to the last volume called VM, which is used mainly for virtual memory.
6. Now run (in the case of this image):
diskutil apfs deleteVolume disk1s5

note 1: you will need to change disk1s5 for your identifier. Probably it will be disk2s4
note 2: I don’t remember if you need to run “umount” first, but if you are faced with an error something like “you cannot to this because it’s mounted”, just run “umount /Volumes/Macintosh\ HD”.
note 3: Don’t worry, that VM volume will be added automatically by the system after your restart
7. After that you’ll be able to remove all the files that you need to free up some space on your mac at “/Volumes/Macintosh\ HD”. Delete at least 2GB. Check your free space with “df -h” command

note1: If you previously unmounted the volume, don’t forget to mount it back again. Do it through disk utility as already described (it’s easier).
8. Finally quit the terminal and restart
9. You saved a lot of time! At least it worked for me :)
See you soon!